

Table of Contents Show
Samsung launched a new Galaxy s10 lineup couple of days ago. The Samsung S10 is power-house as it packs all new Snapdragon 855 and 8Gb RAM (up to 12GB in some models). It has turned all exceptions of the people into reality. As it comes with great hardware, latest software and new stunning design. If you have flashed custom ROM in your Samsung galaxy s10 and you want to come back to stock ROM then this guide covers all the methods you can use to install stock ROM in Samsung s10.
The Samsung Galaxy s10 comes with the latest infinity O display with punch hole for the front camera. It features almost edge to edge screen which looks stunning. It comes with the triple camera at the back which can take some stunning photos and videos. Whereas, S10+ has a total of 5 cameras three on the back and two on the front. Now, let’s continue the guide.
As methods and tips shown below will not install stock android in your device, it will help you to install stock firmware that comes with the device. There is no possible way to install stock android in Galaxy devices.
NOTE: If you don’t know what you are doing, then kindly take the assistance of Expert, we’re not responsible if anything goes wrong.
Install Stock ROM on Samsung Galaxy S10 or S10 Plus:
There are numbers methods you can use to install stock android in your Galaxy s10 and s10 plus. We are going to cover most of them for you. These methods are handy when you want to unroot your smartphone and go back to stock android. By installing stock android you will start getting OTA updates released by the company.
For installing stock firmware Odin is widely used but if you are not comfortable with the Odin you can use SmartSwith:
SmartSwith allows you to backup all your data on your pc. So, you can get your data back after installing stock ROM. There are some limitation with the SmartSwitch as if you bought a phone from a different country and trying to use with SmartSwitch in a different country then it might detect your device’s model no sometimes. This only requires a working computer with an internet connection and USB cable.
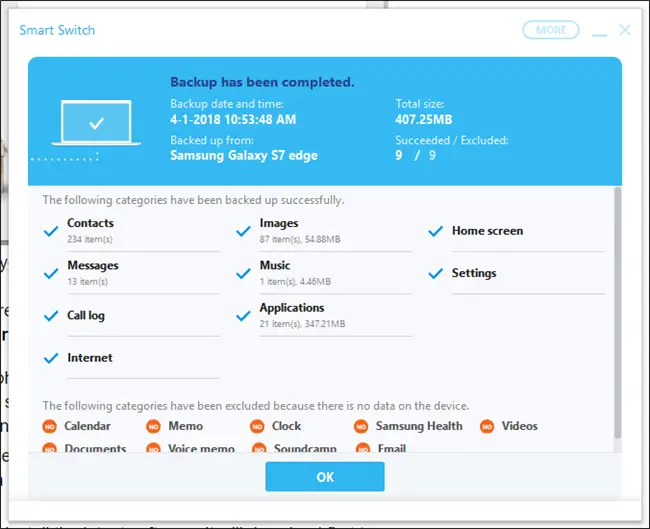
Follow the steps to install stock ROM on Samsung s10:
- First of all, install SmartSwitch on your computer.
- Now, connect your Samsung s10 using an original USB cable.
- SmartSwith will recognize your phone and display its details.
- For install stock firmware, click on the emergency software recovery and installation.
- In this menu, you have to select the software update and initialization.
- Now it displays available firmware your device, find the latest firmware for your device here.
- Follow the on-screen instructions once the process completes your device will reboot.
- Now, you can transfer your data that you have made backup to your device.
Install SmartSwitch: SmartSwitch
Now, if you want to use Odin for installing stock android then follow the steps given below:
How to install stock Android on Samsung S10 or S10 plus using Odin:
When SmartSwitch is not released everyone used Odin to flash stock firmware on Samsung smartphone. Many mid-tier and low-tier Smartphone are not supported by SmartSwitch then Odin is the only option you can try. Installing stock firmware on a Samsung S10 using an Odin is a little bit dangerous. To be honest, it is dangerous if you screw up your self somehow. Like flashing wrong ROM or unplugging your phone in the middle of the process.
The only limitation with the Odin is it only available for windows till now, sorry mac and Linux users. The process requires Samsung drivers and Odin installed on the computer and turn on USB debugging from the settings.
To turn on USB debugging:
- Go to setting and about a device
- Tap on Build number 7 times.
- Go to setting then developer option and turn on USB debugging.
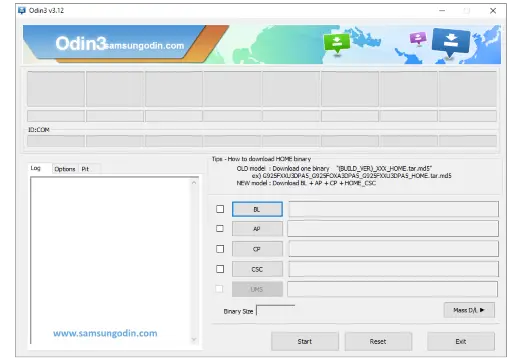
Steps to install stock firmware on Samsung S10 and S10 Plus:
- The first turn of your Samsung S10.
- Now, go to the download mode by pressing Bixby, power, and volume down button at the same time.
- Press the volume up button to process the download mode.
- On your pc open Odin and connect your Samsung S10 to pc with a USB cable.
- You will see your phone connection with your pc and ID:COM on Odin will change to blue(If Odin is failed in detecting your phone then colour did not change, to troubleshoot this make sure correct USB drivers are installed on your device).
- In Odin, you will see a number of options and you have to select a file according to the option. Click on the cp and locate the cp file from the extracted firmware, Similarly locate Ap and Bl from the extracted firmware file.
- If you want to reset your device while installing the stock firmware then load CSC file, if not then load HOME_CSC file instead.
- Make sure F.Reset.Time and Auto Reboot options are selected in the Odin. If any other option is checked then uncheck them.
- Now, everything is ready then click on the “start” button. The whole process will take around 5-10 minutes and your device will reboot after the process completes.
Important Note: Do not disconnect your device from pc in the middle of the process. If flashing fails then try again with the different version of the Odin. Some version of the Odin has Ap files while some versions have PDA files instead of an Ap. If Ap file present in the extracted firmware then load the Ap and flash the firmware.
Download Odin: ODIN
Download USB drivers: Samsung USB drivers
More Posts,